After this post, I will no longer using blogger for my blog. I'm moving over to WordPress. I've tried to figure out how to have this blog forward, but it's waaaaaay over my head. So, if you would be kind enough to change me in your Google Reader or bookmark my new site or visit my new site and sign up to follow I would greatly appreciate it. (I couldn't figure out how to transfer all you kind people who follow this blog to the new blog. Sorry about that.)
I want to give a BIG shout out to Brooke Hall who is working with me to get the new site up and going. I could not have done it without her! If you're ever in need of someone who knows design + all the web tech-y stuff and who emails you right back and is a pleasure to work with, then Brooke is the web guru for you. Thanks Brooke! She also has a delightful blog.
Click HERE to visit my new home.
There is a Free Download of Mother's Day Cards waiting there for you. :)
Showing posts with label business. Show all posts
Showing posts with label business. Show all posts
Tuesday, May 5, 2009


Thursday, April 30, 2009
City Chic Country Mouse are in Etsy's Storque!!
My etsy pals at City Chic Country Mouse are in Etsy's Storque! Click here so you can enjoy the article too. It's so fun to see and learn about etsy friends!

 Jamie and her mom, Carmen, with some fabric goodness.
 Jamie and her mom, Carmen, with some fabric goodness.
photo by SLGDesigns
I'm still loving all the goodies I got from them and use them on a daily basis. They make me smile.
A heart-felt thanks to Jamie and Carmen for the nod to Whisker Graphics and me in their article. So very kind of you.
A heart-felt thanks to Jamie and Carmen for the nod to Whisker Graphics and me in their article. So very kind of you.
Wednesday, April 22, 2009
New for the Shop - Printable and Editable PDF Templates
I'm so excited about these!
I just finished updating the PDF templates in my etsy shop to be editable. So now, rather than printing generic paper goods, they can be personalized, customized or easier to fill in.

 With the editable Recipe Cards you can type your recipe right into the PDF or copy/paste recipes from the web and print. No More Handwriting!! You can edit the recipe in the PDF too. Add your own notes or substitutions. Of course, you can still print them blank to use or give.


 These 2" square tags/labels I created with the hobbyist or etsy shop owner in mind, but they could be handy for anyone (personal calling cards or address labels). They come blank and the text can be formatted in MS Word or such and pasted into the PDF. The above Crown tags all came from one sheet. Print them on cardstock or label paper. So MANY possibilities!
I'll share new designs as I create them.
A BIG THANK YOU to those who were kind enough to do the testing for this process. I really appreciate it!
Whitney
I just finished updating the PDF templates in my etsy shop to be editable. So now, rather than printing generic paper goods, they can be personalized, customized or easier to fill in.

 With the editable Recipe Cards you can type your recipe right into the PDF or copy/paste recipes from the web and print. No More Handwriting!! You can edit the recipe in the PDF too. Add your own notes or substitutions. Of course, you can still print them blank to use or give.

 These 2" square tags/labels I created with the hobbyist or etsy shop owner in mind, but they could be handy for anyone (personal calling cards or address labels). They come blank and the text can be formatted in MS Word or such and pasted into the PDF. The above Crown tags all came from one sheet. Print them on cardstock or label paper. So MANY possibilities!
I'll share new designs as I create them.
A BIG THANK YOU to those who were kind enough to do the testing for this process. I really appreciate it!
Whitney
Thursday, April 16, 2009
Better Photos?? I'm trying - Here's a Few Tips
I'm not a photographer. It's very evident if you look at my product photos in my etsy shop. I've been going crazy the last few weeks trying to learn how to take better photos. I've read again and again how natural light and no flash are the answer. But that is not always (read:hardly ever) convenient. I think I'm making some progress, so I thought I'd share a few of the things I've learned so far.
#1 - Get to know your camera. Read the boring manual. I have a Pentax Optio S60 - Point and Shoot. I can't change too many settings, BUT I did learn about changing the White Balance. Very important to set it to the correct lighting.
#2 - Lighting - Miss B over BlahBlahBlag found some great lights here, but they were out of my budget, so I found these. You can get them here. $15 each. I put 2 in lamps with clamps (from my garage, but you can buy them at a hardware store) and 1 in a desk lamp from IKEA

Heres what my "photo studio" looks like. Swanky, no?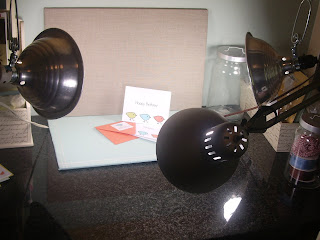
I clamped the lamps onto some overhead cabinets. Sometimes I use a light tent, but I'm finding with these bulbs, I don't need need it. Got bigger stuff to shoot like aprons or ironing board covers? Take a look at this article.
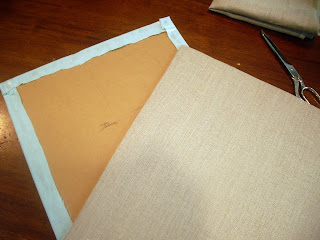
I also wrapped two pieces of scrap cardboard; one in tan linen fabric (left over from the bottom of my bedroom drapes from IKEA) and one in robin's egg blue kitchen towel (from Target - Easter clearance - $1.25). I secured the fabric by hot glueing it in the back. These are backdrops.
Here's an un-retouched photo with the bulbs and the correct camera settings and my new backdrops.
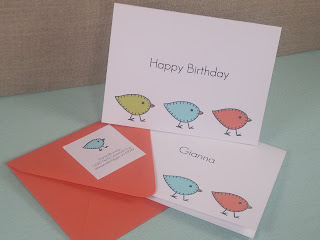
It's a big improvement over what I've done in the past. I still need to get LOTS better at staging the photo. I'm on the search for props and such.
#3 - Retouching - If the correct camera setting and lights still don't deliver what you want, there's Photoshop. There is this very helpful article from The Switchboards.com. I learned a lot from the article, but I was still having trouble getting my whites white without messing up my other colors. Well, last week, my son's friend showed me how to fix that. With your photo open in Photoshop click on the "Image" menu, go down to "Adjustments" and select "Selective Color". You can then play with each color independently of all the other colors.
Here is the original photo...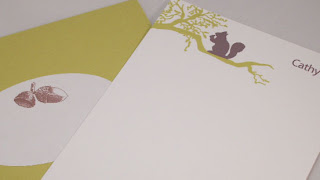
Here's the same photo after using the Selective Color controls in Photoshop. No, it's not the best photo in the world, but it is more accurate of what the product looks like.
I hope this information helps someone. I've so appreciated others who have given tips. There is Pioneer Woman's blog which is incredibly generous and knowledgeable.
Now if I could just figure out why all my photos are a tad hazy!
#1 - Get to know your camera. Read the boring manual. I have a Pentax Optio S60 - Point and Shoot. I can't change too many settings, BUT I did learn about changing the White Balance. Very important to set it to the correct lighting.
#2 - Lighting - Miss B over BlahBlahBlag found some great lights here, but they were out of my budget, so I found these. You can get them here. $15 each. I put 2 in lamps with clamps (from my garage, but you can buy them at a hardware store) and 1 in a desk lamp from IKEA
Heres what my "photo studio" looks like. Swanky, no?

I clamped the lamps onto some overhead cabinets. Sometimes I use a light tent, but I'm finding with these bulbs, I don't need need it. Got bigger stuff to shoot like aprons or ironing board covers? Take a look at this article.
I also wrapped two pieces of scrap cardboard; one in tan linen fabric (left over from the bottom of my bedroom drapes from IKEA) and one in robin's egg blue kitchen towel (from Target - Easter clearance - $1.25). I secured the fabric by hot glueing it in the back. These are backdrops.

Here's an un-retouched photo with the bulbs and the correct camera settings and my new backdrops.

It's a big improvement over what I've done in the past. I still need to get LOTS better at staging the photo. I'm on the search for props and such.
#3 - Retouching - If the correct camera setting and lights still don't deliver what you want, there's Photoshop. There is this very helpful article from The Switchboards.com. I learned a lot from the article, but I was still having trouble getting my whites white without messing up my other colors. Well, last week, my son's friend showed me how to fix that. With your photo open in Photoshop click on the "Image" menu, go down to "Adjustments" and select "Selective Color". You can then play with each color independently of all the other colors.
Here is the original photo...

Here's the same photo after using the Selective Color controls in Photoshop. No, it's not the best photo in the world, but it is more accurate of what the product looks like.

I hope this information helps someone. I've so appreciated others who have given tips. There is Pioneer Woman's blog which is incredibly generous and knowledgeable.
Now if I could just figure out why all my photos are a tad hazy!
Monday, April 13, 2009
A Mention on a Beautiful Blog
 Last Friday Whisker Graphics got a mention from Wanwisa on her beautiful blog, Modern Vintage. Her site was a new discovery for me and now I have it safely bookmarked so I can visit often. I got blissfully lost in visiting all her posts! She featured some of my PDF template designs. (After seeing my product photos compared to other photos on her site, it is glaringly apparent that I really must get better at taking photos. I'm trying, really I am.) Go take a look here.
Thanks Wanwisa!
xo
Whitney
Thursday, March 26, 2009
New Look
I don't know if its all the trees starting sprouting new growth or the flowers blooming, but I've been feeling that my business identity needed to grow/change too. Something cleaner. Something fresher. So I did a little overhaul on my blogger header. Knowing me, I'll probably change it again in 6 months!
Sunday, March 15, 2009
Testing. Testing. 1, 2, 3 -- I Need Some Help
I apologize for my lack of posts. I've been busy, busy creating some invitation designs to enter in a contest here, trying to figure out how to take better photos for my ad here, working on a web home page for Whisker Graphics and last but not least, working on a new product for my shop. The new product is where I need some help. I'm looking for a few people to help me work out any kinks.
Here's what it would entail:
-I will email you a PDF set of paper goods with instructions and a questionnaire. You follow the instructions and fill in the questionnaire.
-What you'll need: color printer, MS Word (or something like it), paper, scissors, ruler, x-acto knife.
-Time commitment: less than an hour.
-What's in it for you: You can select any 2 PDF sets from my shop for free.
If you are willing to be a tester, leave a comment (with a way for me to contact you) or send me an email (click on my mugshot) and let me know your level of craft skills (i.e. from "Craft Goddess" to "I Know What Scissors Are"). I will email those selected.
Thanks in advance!
**** UPDATE***** Thank you all for your responses! I have enough volunteers now and will be contacting you shortly.
xo
Whitney
Here's what it would entail:
-I will email you a PDF set of paper goods with instructions and a questionnaire. You follow the instructions and fill in the questionnaire.
-What you'll need: color printer, MS Word (or something like it), paper, scissors, ruler, x-acto knife.
-Time commitment: less than an hour.
-What's in it for you: You can select any 2 PDF sets from my shop for free.
If you are willing to be a tester, leave a comment (with a way for me to contact you) or send me an email (click on my mugshot) and let me know your level of craft skills (i.e. from "Craft Goddess" to "I Know What Scissors Are"). I will email those selected.
Thanks in advance!
**** UPDATE***** Thank you all for your responses! I have enough volunteers now and will be contacting you shortly.
xo
Whitney
Monday, March 9, 2009
Oh, my aching back... No more!
I started Whisker Graphics last June on a shoestring budget. That budget has not changed. My "studio" is our 4th bedroom. It's not fancy, nor beautiful. My computer workspace is a "desk" (a plastic folding cafeteria table from Costco, ugly but roomy) and my laptop.
 My laptop sat too low for me. I constantly hunched over to look at the screen and that made my back ache in the worst way. I wasn't sure how to remedy this. Then, I saw a photo of Marty Stewart in her office and she had this nifty stand for her laptop. "I want one of those," I thought to myself. With my budget in mind, I set my spending limit at $0.
 First I asked friends if they had an old keyboard I could have. They did. Then I did a trial run with a folding breakfast tray to make sure the height and keyboard would work. (That ugly legal pad to the right is my mouse pad.)
 The LOML made the stand out of some scrap plywood we had in the garage. Not up to Martha's standards for sure, but then again, Martha's budget is bigger. I had some white craft paint (bought when it was on sale 2 for $1), a foam brush (bought when on sale 10 for $1) and my trusy paint tray (an old frozen dinner plastic tray) and leftover paint from our bathroom.
 A coat of the white craft paint first to act as primer.
 Then coat of Gossamer Blue paint from Benjamin Moore and my backsaver was finished. Both my back and my budget are satisfied!
 My laptop sat too low for me. I constantly hunched over to look at the screen and that made my back ache in the worst way. I wasn't sure how to remedy this. Then, I saw a photo of Marty Stewart in her office and she had this nifty stand for her laptop. "I want one of those," I thought to myself. With my budget in mind, I set my spending limit at $0.
 First I asked friends if they had an old keyboard I could have. They did. Then I did a trial run with a folding breakfast tray to make sure the height and keyboard would work. (That ugly legal pad to the right is my mouse pad.)
 The LOML made the stand out of some scrap plywood we had in the garage. Not up to Martha's standards for sure, but then again, Martha's budget is bigger. I had some white craft paint (bought when it was on sale 2 for $1), a foam brush (bought when on sale 10 for $1) and my trusy paint tray (an old frozen dinner plastic tray) and leftover paint from our bathroom.
 A coat of the white craft paint first to act as primer.
 Then coat of Gossamer Blue paint from Benjamin Moore and my backsaver was finished. Both my back and my budget are satisfied!
Thursday, January 15, 2009
Another Valentine After All
I THOUGHT I was only going to create one design for Valentine's Day, but I came across a couple of cupid graphics that inspired me. I decided to do a PDF Valentine Set for the etsy shop. I tried to make them flexible to use.
 The PDF files all printed out.
 Everything cut up and ready to give.
Each little Love Note is for writing something you love or appreciate about someone. Similar to the Bucket of Love concept, but instead of having all the notes in one place, I like the idea of hiding them all over the place so they can be found for days on end.
The Petite Valentines are for using as gift tags (maybe with a Hershey Kiss taped to it?) or punch a couple of holes in it and "weave" a lollipop through.
The labels are just for fun; sealing envelopes, decorating a package or making Valentines with.
 The PDF files all printed out.
 Everything cut up and ready to give.
Each little Love Note is for writing something you love or appreciate about someone. Similar to the Bucket of Love concept, but instead of having all the notes in one place, I like the idea of hiding them all over the place so they can be found for days on end.
The Petite Valentines are for using as gift tags (maybe with a Hershey Kiss taped to it?) or punch a couple of holes in it and "weave" a lollipop through.
The labels are just for fun; sealing envelopes, decorating a package or making Valentines with.
Wednesday, January 7, 2009
My First Advertisement!
If you get a chance, check out my first advertisement. Stephanie over at StephModo contacted me about advertising on her blog. I checked out her blog and promptly said YES!. Her blog is just wonderful and has a bit of everything; some design, some food, some personal, some everything! Take a peek here. Thanks Stephanie!
Wednesday, December 31, 2008
A Sweet Mouse All Dressed Up

Ok, this little mouse is not ALL dressed up. I mean, she is lacking attire, but she's got it going on in the accessory department.
This is the newest stationery set for my etsy shop. It came about when Jamie at City Chic Country Mouse (click here to see the seriously cute stuff in her shop) wrote that she was having a hard time finding cute mouse graphics. I thought Hmmm... if she was having a challenge, then perhaps other mouse admirers were also. So I set to work and came up with this little gal.
 She travels through the mail with her sister
 who likes to ride on the envelope.
 This is the three color combinations she comes in.
Wednesday, December 3, 2008
My 2009 Calendar

Timing is everything they say and though calendars are all about time, I blew the timing of creating a calendar for my etsy shop this year. I'm learning as I go and it looks like the beginning of November was the time to introduce this time sensitive item. Next year I'll know. I still wanted to create one because I thought it would be fun and a good learning experience. It was both. So this year there will be none for sale, but here's what I made to give as gifts.


Monday, November 17, 2008
Party Invites for my Niece
Time flies! My niece Gia is turning 4. Seems like last week she was born...
Well it's her first "little friends" birthday party and I offered to create the invites. She decided on a princess theme and my sister and brother-in-law were kind enough to just trust me to come up with something.
Here's what I came up with...

Of course she would need some Thank You notes too!

I hope they like them. I think I will make some into birth announcements for my etsy shop
Well it's her first "little friends" birthday party and I offered to create the invites. She decided on a princess theme and my sister and brother-in-law were kind enough to just trust me to come up with something.
Here's what I came up with...

Of course she would need some Thank You notes too!

I hope they like them. I think I will make some into birth announcements for my etsy shop
Sunday, November 16, 2008
What a Pretty Treasury!!
Jen over at Paper Wren put together a very pretty Treasury on etsy called Tipetty Tap Tipetty Tap and was kind enough to include my "Hello" / Typewriter gocco-ed flat notes. I love the subject matter and colors she focused on! Thanks Jen!


Friday, November 14, 2008
What an Honor!!
Miss B over at leblahg.com invited me to do an "On the Download" on her blog today. "On the Download" is a weekly (on Fridays) free download of an creator's artwork. I've put together an assortment of gift tags just for the download.

I was so honored by her invite. I adore her blog! It's beautiful, informative and so fun to read!
So scamper on over and get yourself some free gift tags! And of course, check out all the great things on her blog (not to mention her beautiful paper goods in her etsy shop)!
Enjoy!

I was so honored by her invite. I adore her blog! It's beautiful, informative and so fun to read!
So scamper on over and get yourself some free gift tags! And of course, check out all the great things on her blog (not to mention her beautiful paper goods in her etsy shop)!
Enjoy!
Monday, November 3, 2008
Another Treasury!
It's always exciting to know that someone has looked at my work and then liked it and then shared! Well, Stacey at bipsy on etsy did just that with her darn cute Treasury titled "Ah Nuts". Those are my squirrel note cards in the top right.
Here it is... (sorry for not showing the whole treasury. I still can't figure out how to capture the whole screen. My apologies to the artists who I cut off.)

Are those squirrel booties cute or what?
Here it is... (sorry for not showing the whole treasury. I still can't figure out how to capture the whole screen. My apologies to the artists who I cut off.)

Are those squirrel booties cute or what?
Thursday, October 30, 2008
Featured in a Treasury!
Elena at Tickled Pink Knits (take a peek at her shop, down right beautiful pieces) has put together a very lovely treasury called "Oh Honey Brown Bear" (super cute title) and included my "New Hive" moving announcements.
Here's a look at it...

Elena did a fabulous treasury and I love the mellow yellow vibe! Thanks for including me!
Here's a look at it...

Elena did a fabulous treasury and I love the mellow yellow vibe! Thanks for including me!
Monday, October 27, 2008
For the Do-It-Yourself People
Something new and different in my esty shop. Stationery you can print at home. I love the convenience of this idea! You'll always have a note card or gift tag on hand or a last minute gift! Print any time you like. As much as you like.
Everything is formatted to print out on 8.5" x 11" sheets.
This photo shows the gift tags on top, the folded note cards at the bottom and the envelope seals to the left.

This is a shot of some folded note cards and gift tags cut and ready to go.

This is of a folded note card and some gift tags.

The envelope stickers/seals in action.

Holiday cards and gift tags.

Most of the designs can be personalized too.

I had a great time creating these and looking forward to doing more...
Everything is formatted to print out on 8.5" x 11" sheets.
This photo shows the gift tags on top, the folded note cards at the bottom and the envelope seals to the left.

This is a shot of some folded note cards and gift tags cut and ready to go.

This is of a folded note card and some gift tags.

The envelope stickers/seals in action.

Holiday cards and gift tags.

Most of the designs can be personalized too.

I had a great time creating these and looking forward to doing more...
Thursday, October 23, 2008
Good Fortunes
Who doesn't love cracking open a fortune cookie and seeing what's in store for their future or reading something nice about their personality? Well, I do, especially when it's something good, plus you get to eat a cookie.
A month or so ago, I read an article in Cottage Living (I think) about a woman's cute cottage decor and she had a big post in her home with tons of fortunes tacked up all over it. That sparked the idea for my fortune cookie card. I thought it would be fun to give a card that the receiver interacted with a bit. I did a mock up and had it resting on my desk for several weeks. Each person in my family mentioned in passing that they really liked it, so I thought I would put it in my etsy shop and give it a go.
Here are some photos of it. It comes in a package of 5 cards with 1 list of fortunes to cut and insert in the cookie and 1 blank card to create your own fortunes.
Feel free to leave a comment if you have any good fortunes.


A month or so ago, I read an article in Cottage Living (I think) about a woman's cute cottage decor and she had a big post in her home with tons of fortunes tacked up all over it. That sparked the idea for my fortune cookie card. I thought it would be fun to give a card that the receiver interacted with a bit. I did a mock up and had it resting on my desk for several weeks. Each person in my family mentioned in passing that they really liked it, so I thought I would put it in my etsy shop and give it a go.
Here are some photos of it. It comes in a package of 5 cards with 1 list of fortunes to cut and insert in the cookie and 1 blank card to create your own fortunes.
Feel free to leave a comment if you have any good fortunes.


Tuesday, October 21, 2008
Always Learning...
This last week, Thursday, Friday and Saturday to be exact, I received a great business lesson. My friend, Marcia at Cottage Jewel, invited me to participate in a craft boutique. Though I had just 3 days to prep, I jumped at the opportunity because I've wanting to be in a couple of boutiques this holiday season. Since most all my creations are personalized I just needed to put together a display board or two, set out my portfolio and business cards and I'd be good to go.
Here's my little display.
 I did some cards to hand out so people could shop on line if I didn't the chance to talk with them at the show.

So far, so good...
I had a nice time. Met some wonderful people. Had many laughs with Marcia. And sold one pack of $3 gift tags. Oops! What happened?
This boutique has been going on for 20 years with many of the same sellers. Why such dismal sales for moi?? Here's the lesson part. I forgot to ask who the target market was for customers. Here are a few photos of other sellers' goods.


All perfectly nice items, handmade from lovely women and all in a completely different style than mine and all ready to be bought on the spot.
Lesson learned: Research, research, research the venue before committing.
Here's my little display.
 I did some cards to hand out so people could shop on line if I didn't the chance to talk with them at the show.
So far, so good...
I had a nice time. Met some wonderful people. Had many laughs with Marcia. And sold one pack of $3 gift tags. Oops! What happened?
This boutique has been going on for 20 years with many of the same sellers. Why such dismal sales for moi?? Here's the lesson part. I forgot to ask who the target market was for customers. Here are a few photos of other sellers' goods.


All perfectly nice items, handmade from lovely women and all in a completely different style than mine and all ready to be bought on the spot.
Lesson learned: Research, research, research the venue before committing.
Subscribe to:
Posts (Atom)


 Posts
Posts